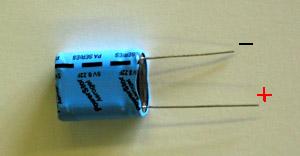
 Find the capacitor
in your kit.
The dashed black line on one side of the container marks the wire
that is supposed to be connected to the negative side
of the battery (the end that is indented).
Find the capacitor
in your kit.
The dashed black line on one side of the container marks the wire
that is supposed to be connected to the negative side
of the battery (the end that is indented). Find the capacitor
in your kit.
The dashed black line on one side of the container marks the wire
that is supposed to be connected to the negative side
of the battery (the end that is indented).
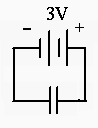
1. Charge up the capacitor by connecting the two terminals to the two ends of a pair of batteries in series.
 |
<- picture circuit diagram -> |
 |
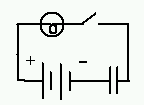
2. Show that a capacitor will hold the stored charge and energy for a while when it is not connected to anything. Then show that you can discharge the capacitor with a wire or a paper clip or any other conductor, by using it to make a conducting path from one terminal of the capacitor to the other terminal.
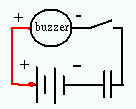
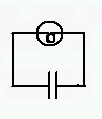
3. Now build these circuits:
|
 |
 |
|
Which way is the current flowing while you charge a capacitor?
Which way is the current flowing when you use this capacitor to run a device? |
|
Check the box when you are
done:
Next:Science content: Electrical concepts