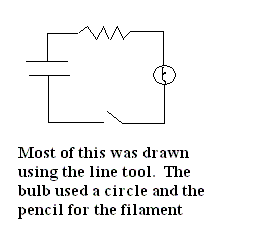
Sometimes it is much simpler to draw a picture than describe a situation. In this Virtual Workshop, we will frequently make use of diagrams to represent electric circuits. What if you want to draw one, too? Here's a way that isn't very complicated.
All Windows computers come with a set of standard programs, one of which is called Paint. You will find it by clicking on the Start button, choosing All Programs from the set of options offered, Accessories from the resulting list, and Paint is on the sublist.
Paint gives you a blank white screen and a few tools to draw pictures on it. It is a little awkward to use, because we don't know how to draw by pushing a mouse around. Making a smooth curve or a straight line is not easy, and this medium will never produce great art. But we are only going to try for a usable sketch. Here are the most useful tools:
- The size and shape of the drawing can be set by placing the cursor over the lower right-hand corner of the white region and dragging it to someplace else.
- There are 16 tools you can use. Click on the icon to turn a tool on.
- The pencil will draw lines, but only makes one line width. It starts drawing where you click, and then draws wherever the cursor goes until you release the mouse button.
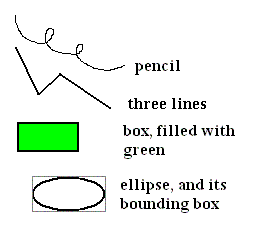
- The line tool will draw a straight line between two points. The first step is to choose a line width (a slightly thicker line than the thinnest one will look a little better, most of the time). Drawing a straight line is done the same way as drawing with a pencil, but the resulting line goes from start to finish ignoring how the mouse moved in between.
- The rectangle tool is a useful short cut when you want a box. You click at the position of the upper right-hand corner of the rectangle, and then release at the lower left-hand corner. The line width is whatever you chose using the line tool (in other options for the rectangle tool, the box is filled with some color).
- The ellipse tool is harder to use. You must imagine a bounding box that exactly contains the ellipse, and then mark the upper right-hand corner and lower left-hand corner of that box. These points are not on the ellipse! Putting a circle of a certain size at a certain place is very tricky.
- You can choose the colors of the lines from the palette.
- After you have made an enclosed region by drawing with these tools, you can color the interior using the inkpot. Choose a color from the palette and then click the inkpot in the region you want to color. The new color flows through the region that had the original color of the point that was clicked on. You can change the colors of a line this way.
- The Alphabet tool lets you put labels on things. Unfortunately, it sometimes erases parts of your diagram. It sometimes helps to make the labels first (if you can anticipate where they will be needed), and they also can be moved around later, using the Select tool.
- The Select tool (the dotted rectangle) lets you move, erase, or copy rectangular regions.
After you have selected the Select tool, you "make a box" (as for the Rectangle tool) around the region of interest. If you then click inside the selected box, you can drag it to elsewhere; or you can use commands from the Edit menu to Cut, Copy, or Clear the region. By clicking outside the box, you can unselect it. After you have Cut or Copied a region, you can Paste the contents (from the Edit menu) to someplace else or even to a different diagram.
- The Eraser will let you erase a part of a line, or a region. The erased region is white. For small erasures, you can instead draw over the part to be erased with the pencil, set at the color of the background.
- The Edit menu has an Undo feature that will let you go back several steps.
- The other tools do other things, but are less useful
- Finally the diagram is saved by the Save As... command on the File menu (or just Save, if the intention is to replace a previously saved version of the diagram). Note that in addition to choosing the file name, you also can choose the kind of file. Saving as a bitmap makes a large file, but it is exactly what you drew. Saving as a GIF makes a smaller file, but loses some color information. Saving as a JPEG also makes a smaller file in a different way; it does better on colors but regions that were of a solid color now vary subtly, so that it is no longer possible to change the color of the region using the Fill tool. If you are going to email the file to someone, the GIF or JPEG types are better because the file size is small.